Buying an espresso machine is exciting. You unbox it, set it up, press the button… and—well, sometimes the shot tastes good, but more often it’s watery, bitter, or sour. Here’s the hidden truth: the machine alone won’t guarantee café-quality espresso.
Most entry-level machines come with pressurized baskets. These baskets are designed to make life easier: they force coffee through a single pinhole, build artificial pressure, and create something that looks like espresso crema. But this “training wheel” design also hides your mistakes. You can use pre-ground supermarket coffee and still get a foamy layer—but you’ll never actually learn how extraction works.
If you want to make real espresso at home—the kind that tastes sweet, balanced, and layered with flavor—you need more than just the machine. You need the right must have espresso accessories.
This guide breaks everything down into three tiers:
- Absolute Must Haves – the non-negotiable accessories that transform your machine into a real learning tool.
- Recommended Upgrades – great once you’re consistent and want to refine workflow.
- Optional Extras – handy, but not required for café-quality coffee.
By the end, you’ll know:
- Which tools to buy now vs later.
- How to use each one step by step.
- Common mistakes and how to avoid them.
- Why these accessories make such a difference in taste.
Let’s dive in!
Table of Contents
Why Must Have Espresso Accessories Matter
Espresso is brewed under ~9 bars of pressure in just 25–30 seconds. That’s like forcing hot water through a tightly packed puck of coffee with the pressure of a car tire. Small inconsistencies in grind size, dose, or tamping quickly snowball into big differences in flavor.
| Without accessories, you’ll often face: | With the right accessories, you gain: |
| Watery, sour, or bitter shots – because you can’t control dose or extraction. | Accuracy – precise dosing and brewing ratios. |
| Messy counters – from coffee spilling everywhere during grinding. | Cleanliness – tidy workflow and less wasted coffee. |
| Guesswork – no way to measure or troubleshoot consistently. | Feedback – tools that show you what went wrong so you can fix it. |
Think of it this way: buying an espresso machine without accessories is like buying a bike without pedals. Technically, it’s a bike—but you can’t actually ride it properly until you add the missing parts.
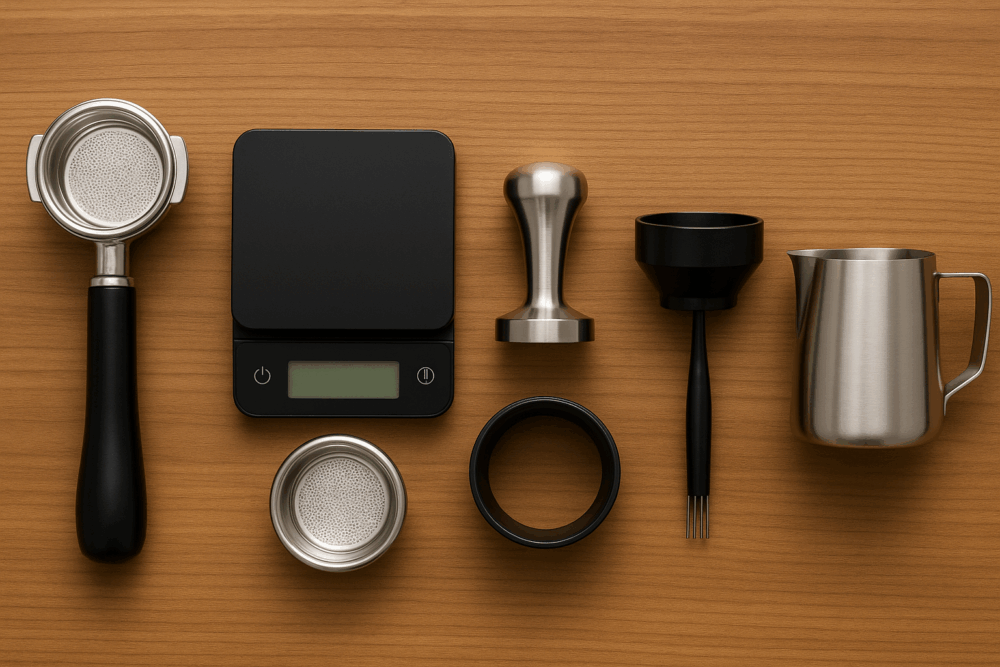
Tier 1: The Absolute Must Have Espresso Accessories
If you buy nothing else, start here. These are the tools that separate “pushing a button and hoping” from actually learning espresso as a skill.
1. Non-Pressurized Portafilter + IMS Basket
Why it matters
Most beginner espresso machines come with pressurized baskets. These create resistance artificially, forcing coffee through a single small hole. They allow you to use pre-ground supermarket beans and still produce fake crema. Sounds convenient—but here’s the catch:
- They hide your mistakes. Whether you tamp unevenly or grind inconsistently, the basket “fixes” it.
- They teach you nothing about extraction. You can’t see what’s happening, so you can’t improve.
- They limit flavor clarity. Real crema and sweetness come from proper extraction—not from a pressurized hole.
That’s why you need:
- A non-pressurized portafilter (either bottomless or spouted).
- A precision basket like IMS, designed with laser-cut, uniform holes for even water flow.
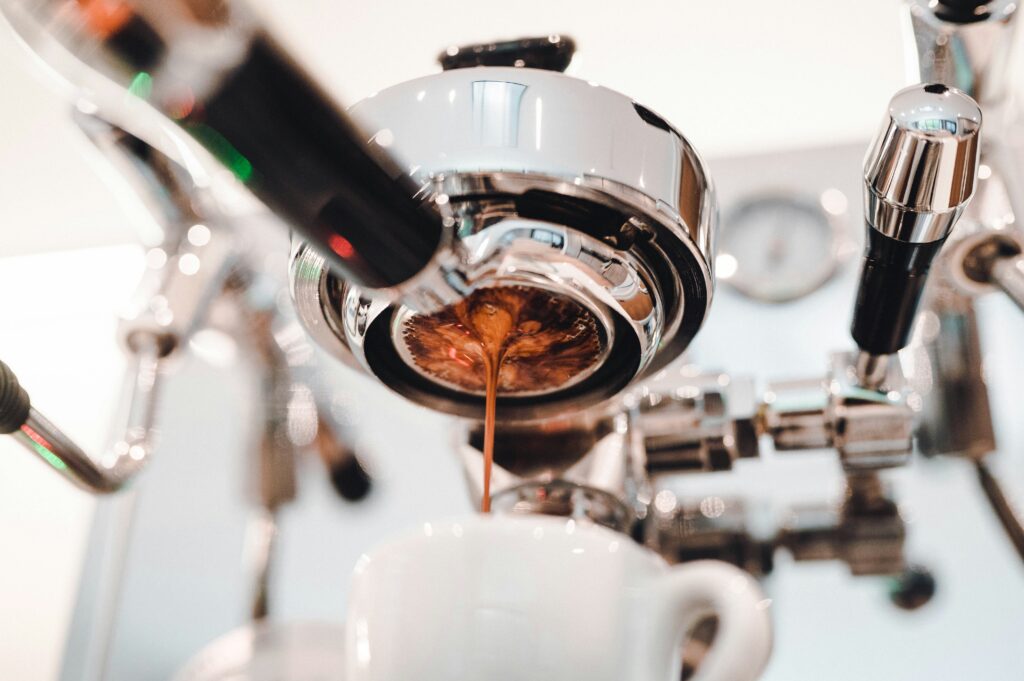
Bottomless vs. spouted
- Bottomless portafilter: The best learning tool. You see the shot flow directly from the puck. If streams spray sideways, or if the flow splits unevenly, that’s instant feedback. Early shots will look messy—and that’s good! It tells you how to improve your grind, distribution, or tamp.
- Spouted portafilter: Cleaner and less messy, ideal for serving multiple drinks. But it hides the visual cues.
Pro Tip: If you’re serious about learning, start with bottomless. If you care more about tidiness, go with spouted. Many baristas keep both.
Why IMS baskets help
A standard basket might look fine, but the hole pattern is often inconsistent. IMS baskets are engineered for precision:
- Uniform hole size and placement → even water flow.
- Better crema and clarity → more sweetness, less muddiness.
- Durability → they last for years.
Common beginner mistakes
- Sticking with pressurized baskets too long. They feel easy, but they cap your potential.
- Blaming the machine. With non-pressurized baskets, messy extractions are not the machine’s fault—they’re your feedback system.
2. Coffee Scale – Control Every Variable
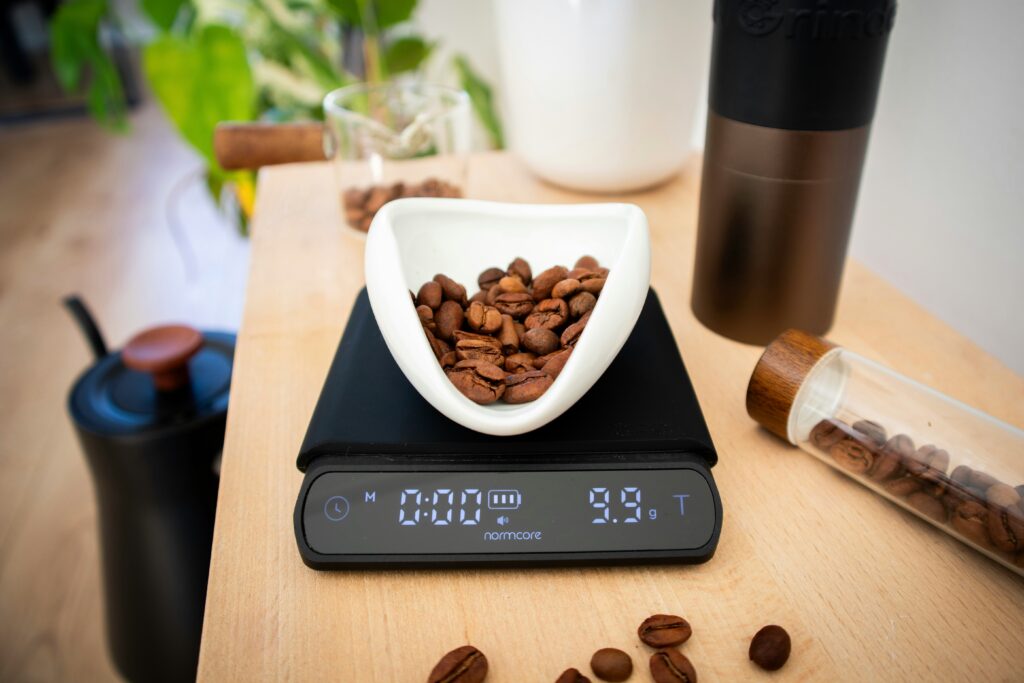
Why it matters
Espresso is built on ratios: coffee in vs espresso out. Without a scale, you’re guessing—and guessing leads to inconsistency.
Think of baking bread: you wouldn’t just scoop flour with a spoon and hope for the best. You measure in grams. Espresso requires the same precision.
How to use it
- Weigh your beans before grinding. Example: 18 g. This ensures consistent dosing.
- Brew into a cup on the scale. Stop the shot when you reach ~36 g output for a 1:2 ratio.
That’s it. Already, you’re more precise than 90% of beginners.
Advanced use: Some baristas weigh their portafilter before and after grinding to check grinder retention (coffee that gets stuck inside the grinder). Not critical for beginners, but useful if you’re chasing precision.
Limitations to know
- Not all scales fit under espresso spouts.
- Some auto-turn off mid-shot.
Pro Tip: If your scale doesn’t fit or shuts off, don’t panic. Just weigh beans before grinding and measure your cup after brewing. It’s still far better than eyeballing.
Buying tips
- Precision: 0.1 g increments.
- Speed: Fast response time.
- Size: Small enough to fit on drip tray.
- Durability: Splash resistant.
Want to know more about the importance of weighing beans? Check out my other blog article: Weighing Coffee Beans vs Scooping: What Makes the Difference?
3. Tamper – Consistent Puck Compression
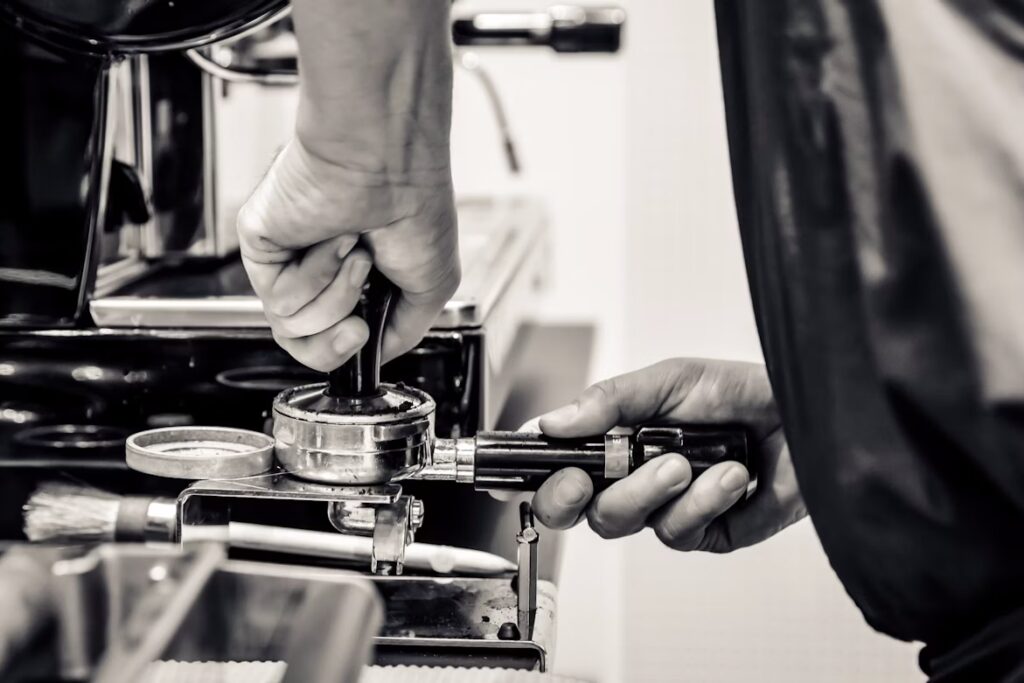
Why it matters
Imagine pouring water on cracked pavement—it runs into the cracks, not evenly across the surface. That’s what happens when your espresso puck isn’t tamped evenly. The pressurized water at 9 bars will always find the weakest spot, causing channeling (fast streams that bypass other grounds).
Plastic tampers that come with machines are like toy hammers for construction—too light, too small, and unreliable. A real tamper is non-negotiable.
How to use it step by step
- Place portafilter on a tamping mat or holder for stability.
- Hold the tamper like a doorknob.
- Press straight down until the puck feels firm.
- Apply even, level pressure.
- Give a slight polish twist.
Beginner mistakes
- Tamping at an angle. Leads to uneven extraction.
- Tamping too lightly. Puck doesn’t resist water enough.
- Over-tamping. Pushing harder than necessary doesn’t improve results—machines brew at far more pressure than your arm strength.
Pro Tip: It’s not about force. It’s about evenness. Think “balance,” not “muscle.”
Buying tips
- Match the tamper size to your basket (58.5 mm for standard, 53/51 mm for smaller machines).
- Heavier tampers feel more stable.
- Spring-loaded tampers are great for beginners—they click when pressure is consistent.
4. Dosing Funnel + WDT Tool – Tidy Distribution
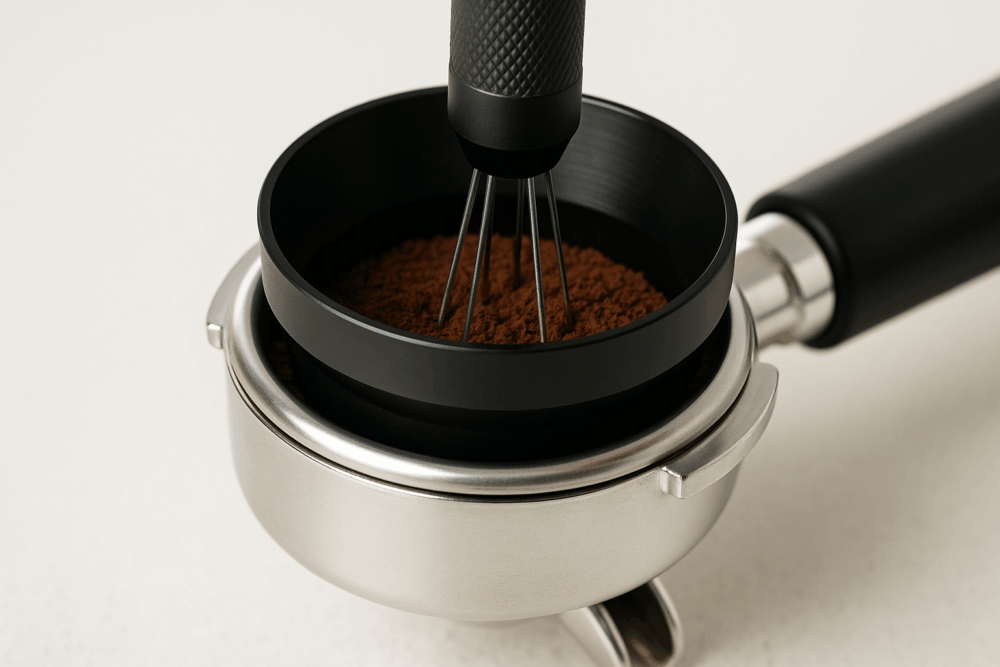
Why they matter
When you grind coffee into a portafilter, it doesn’t land evenly. It piles up like a mountain, with clumps and gaps. If you tamp this uneven mound, water will rush through some areas and barely touch others.
Two accessories solve this:
- Dosing Funnel → keeps grounds inside the basket, preventing waste and mess.
- WDT Tool (Weiss Distribution Technique) → thin needles that stir and break clumps, creating a uniform surface.
Together, they’re game-changing for consistency.
How to use them
- Attach funnel before grinding.
- Grind coffee into portafilter.
- Insert WDT tool and stir in gentle circles to break clumps.
- Level off the surface with light passes.
- Tap portafilter lightly to settle grounds.
- Remove funnel and tamp.
Pro tips:
- DIY WDT = paperclip. It works, but real WDT tools have polished, thin needles that won’t damage baskets.
- DIY funnel = cut the bottom off a yogurt container.
Common mistakes
- Skipping WDT with cheap grinders. These grinders produce clumps—you need WDT most when your grinder is less precise.
- Being too aggressive. Stir gently—don’t dig like you’re mixing dough.
5. Milk Pitcher – For Milk Drinks

Why it matters
If you drink cappuccinos, lattes, or flat whites, you need silky microfoam. A milk pitcher’s shape creates a whirlpool while steaming, blending air into milk evenly. Without one, you’ll end up with bubbly, stiff foam that won’t mix properly.
How to steam milk step by step
- Fill pitcher one-third with cold milk.
- Submerge steam wand tip just below the surface.
- Introduce air by letting it “sip” for a second.
- Lower tip and angle pitcher to create a whirlpool.
- Heat until 60–65 °C (140–149 °F).
- Swirl and tap pitcher to remove bubbles.
Pro tips:
- Whole milk froths easiest.
- Oat milk is the best plant-based option.
- Cold pitcher + cold milk = more steaming time = better control.
Beginner mistakes
- Overheating milk. Above 70 °C (158 °F), proteins break down—texture and taste suffer.
- Too much foam. Cappuccinos need foam; lattes need thinner microfoam. Practice!
Tier 1 Takeaway:
With these six essentials—non-pressurized portafilter + IMS basket, coffee scale, tamper, dosing funnel, WDT tool, and milk pitcher—you’ll brew better than 90% of beginners.
Thinking whether to get some or all of the essentials? Take a quick look at some Espresso Accessories Kits here.
Tier 2: Recommended Upgrades
Once you’re consistent, these upgrades make brewing easier and cleaner.
1. Puck Screen
- Thin mesh disc placed on top of puck.
- Improves water distribution.
- Keeps brew head cleaner.
2. Coffee Storage Container
- Airtight, opaque container keeps beans fresher.
- Vacuum-sealed options slow oxidation.
- NCA (National Coffee Association) recommends cool, dark storage—never fridge/freezer.
3. Tamping Mat or Portafilter Holder
- Protects your counter.
- Stabilizes tamping.
- Hack: fold a towel if you don’t want to buy one.
Tier 2 Takeaway:
These tools smooth workflow but won’t make or break your coffee.
Tier 3: Optional Extras
Nice-to-haves for convenience and polish.
1. Distributor Tool
- Levels coffee before tamping.
- Shortcut: tap tamper base lightly to level.
2. Knockbox
- Bin with bar for knocking out pucks.
- Hack: container + plastic bag liner.
3. Spray Bottle (RDT)
- Light mist of water on beans before grinding reduces static.
- Hack: stir beans with a damp spoon.
Tier 3 Takeaway:
These tools smooth workflow but won’t make or break your coffee.
Beginner Workflow
Your daily routine with must have espresso accessories:
- Weigh beans (e.g., 18 g).
- Grind into portafilter + IMS basket with funnel.
- Stir with WDT tool.
- Tamp evenly.
- Brew to ~36 g.
- Steam milk if making a latte.
- Knock out puck, rinse, wipe.
Recommended Watch: James Hoffmann (World Barista Champion and coffee educator) breaks down his espresso routine with tools and techniques in this excellent video: How I Make Espresso: Tools and Techniques.
Quick Troubleshooting
- Sour shot → grind finer.
- Bitter shot → grind coarser.
- Sprays from bottomless → redo WDT or tamp.
- Bubbly milk → lower wand tip, stop at 65 °C.
Conclusion – Level Up With Must Have Espresso Accessories
To truly learn espresso, you can’t rely on stock pressurized baskets. The following must have espresso accessories transform espresso from frustrating guesswork into a repeatable, learnable skill. Add upgrades later, but start here to level up your home coffee game.
Ready to level up your home coffee game? Start your barista journey today!
Click on the following accessories and check them out in Amazon. Don’t forget to make sure you choose the right size for your espresso machine!
Explore more guides on Yumm Coffee’s coffee blog to learn more about coffee, making your cup better everyday!
Leave a Reply